The Art of Earth-Friendly Tofu
Fresh tofu in 6 simple steps
Soak the soybeans.
1
Blend and strain the soybeans into soy milk.
2
3
Cook the soy milk.
Form the tofu curds.
4
Press the tofu in your tofu mold.
5
Soak the tofu in cold water, and enjoy!
6
Don’t let the steps scare you… Making tofu is super easy!
Inactive prep time: 6 to 12 hours
Cook time: ~1.5 hours
Inactive pressing time: 0.5 to 3 hours
What you need…
~16 cups water
2 cups dry soybeans *
Coagulant: 1 tbsp liquid nigari * or 4 tbsp lemon juice
3 Ingredients
2 cheesecloth squares (36”x36” recommended) *
Tofu mold *
Blender
Large stock pot
Colander (metal mesh recommended)
Small sieve / chinois
Large mixing bowl
6 Kitchen supplies
Here’s how…
Soak the soybeans.
1
Rinse two cups of dry soybeans under cold water and add to a bowl.
Fill bowl with cold water, with a 1:3 ratio (approx.) of soybeans to water.
Cover bowl with a cloth and soak until beans split apart when squeezed between your fingers (between 6 to 12 hours).
Drain and rinse the soaked soybeans until water runs clear.
Note: If soaking for longer than 12 hours, place in the fridge to avoid fermentation.
Blend and strain the soybeans into soymilk.
2
Prepare the straining set up: Dampen one cheesecloth square and fold in half to create a rectangle, then fold in half again to form a square. Place this square over the colander; you can clothespin the cheesecloth to the colander to keep it in place.
Next, dampen the other cheesecloth and place (centered) on top. Take one corner, and fold it in such that the tip is a little past the center of the square. Repeat for all four corners, slightly overlapping each corner. You should end up with a double-layered, slightly smaller square than before, still bigger than the other cheesecloth. (see diagram below)
Set the colander with the two cheesecloths on the stock pot.
Blend the soaked soybeans and roughly 8 cups of water in batches until smooth, dividing both the beans and water equally between batches (e.g., ~4 cups of water per batch if blending in two, though a little less water per batch is fine).
Strain the soybean blend: This step determines the size of your finished tofu — the more soy milk you extract, the larger your tofu block!
Pour the blended mixture into the cheesecloth-lined colander in a minimum of two batches, as this makes the straining process more manageable. Once the first batch is in, gather the edges of the top “2-layer” cheesecloth together to form a closed “bag”, making sure no liquid can escape from the sides. Twist the top tightly before squeezing to keep the bag sealed.
Squeeze and massage the bag firmly, continuing to twist from the top as you go. Keep going until only a couple drops appear with each squeeze. Carefully place this cheesecloth back on your colander (on top of the “4-layer” cheesecloth) and untwist it such that it returns to the “2-layer” cheesecloth square.
Remove some of the fibrous pulp from this cheesecloth. It does not need to be clean before you repeat with the next batch. Repeat this step until all the blended mixture has undergone the straining process.
The liquid you've collected is raw soy milk; the dry fibrous pulp left inside the cheesecloth is called okara — set it aside, as it can be used in other dishes!
Squeeze the remaining soy milk from the bottom folded “4-layer” cheesecloth square in the same way as step 3.
Notes:
DO NOT DRINK THE SOY MILK AT THIS STAGE. Raw soy milk is not edible!
If some okara mix gets into your stock pot, that’s okay – the taste and texture of your tofu will not be significantly altered.
If you’d like to expedite the cooking process, start with step 3.1 below: Add 8 cups of water to your stock pot and begin to boil. Strain the soymilk into a separate bowl, and add to the hot water once strained.
Your cheesecloth is reusable! Clean with mild soap and water, hang to dry. To sanitize, boil.

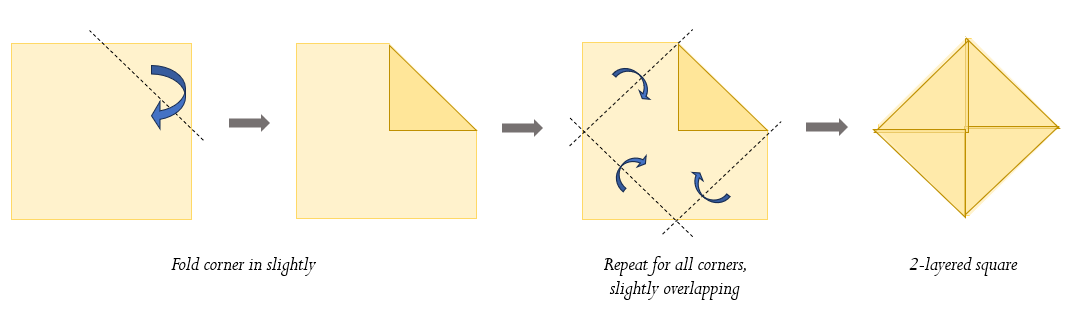
Folding the Top 2-layer Cheesecloth
Folding the Bottom 4-layer Cheesecloth
Cook the soy milk.
3
Add 8 more cups of water to the stock pot and bring to a boil at medium-high heat, then lower temp to a simmer for 10-15 minutes (no lid), stirring occasionally.
Optional step: Flavor your tofu! You can use any salt / spices you like, but avoid acid. Acid will cause your soy milk to coagulate too early.
Meanwhile, prepare your coagulant:
Liquid nigari: Add 1 tbsp of liquid nigari to 2/3 cup of warm water
Lemon juice: Add 2 tbsp of lemon juice (approx. ½ lemon) to ½ cup of warm water
Once the soymilk has simmered, remove from the heat. Let cool for ~1 minute.
Notes:
Stir the bottom of the stock pot occasionally, as a skin may form on the bottom. Foam forms at the surface, which can be skimmed off, but not required.
Keep an eye on the pot. When the mix begins to boil, it will foam up rapidly and can easily boil over.
The longer you simmer the soymilk, the less bean-y it will taste.
Form the tofu curds.
4
Still off the heat, add 1/3 of your coagulant to the soymilk and gently stir in a “Z” shape 3-4 times to spread the coagulant out evenly in the pot.
Add the second 1/3 of coagulant, gently stir in a “Z” shape 1 time. The soymilk will begin to curdle. Allow to sit for ~1 minute.
Add final 1/3 of coagulant, gently stir in a “Z” shape 1 time. Let sit for 2-5 minutes.
If opaque soymilk has gathered on top of the curds, gently press down on the curds, such that the transparent liquid flows into the areas of cloudy soy milk. Do NOT stir.
The soymilk is fully curdled when the liquid is completely clear (may appear slightly yellow) and distinct from the tofu curds; expect the process to take a few minutes.
In the meantime, prepare your tofu mold: Place your mold in a bowl or casserole dish (anything with tall sides) and line the mold with a damp cheesecloth.
Notes:
Do not over-stir the coagulant — over-stirring will disrupt the coagulation process! The “Z” shape is simply meant to spread the coagulant throughout the pot.
TROUBLESHOOTING: If your soymilk is not curdling after adding the last bit of coagulant (wait a few minutes), very gently stir to spread the coagulant throughout the pot. Put your pot back onto low heat and it should curdle within a couple minutes. Otherwise, slowly add small amount of additional coagulant mix.
Ladle the tofu curds into your cheesecloth-lined mold: Using a small sieve, scoop up some curds. Drain excess water by gently pressing the curds with a flat spatula before placing in the mold.
This is where you customize the firmness of your tofu! For firmer tofu, gather enough curds in your small sieve to cover the surface of the mesh. Press them firmly with the flat spatula to remove water before placing them into your mold. The more water you remove prior to placing the curds in your tofu mold, the firmer your tofu will be.
Once all the curds are in the mold, fold the cheesecloth overtop the tofu and place the lid of the mold on top.
Carefully pour out/discard excess liquid from the ladling process.
Place a heavy jar or can on the tofu mold lid (e.g., sauce can).
Compression times (for medium firm to extra firm):
Liquid nigari: 10 minutes to 3 hours
Lemon juice: 30 minutes to 3 hours
Press the tofu in your tofu mold.
5
Remove the formed tofu from the mold and place in a bowl of cold water for 15 minutes.
Store in water in the fridge for maximum freshness; use within 3 days or freeze.
Note: The cold water will draw out any bitterness from the coagulants; soak length to taste.
Soak the tofu in cold water, and enjoy!
6
Pro tip: Boil your fresh tofu in salted water to flavor even before adding sauces!